We can program Assignable Knobs to make them control parameters that we can choose from a list. In this video we’ll start simple, with a Performance that has just one Part.
Our goal is to assign the Part 1 volume to Common Knob 1 and to assign Part 1 Reverb to Common Knob 4.
Why assign volume while that can already be controlled by the slider? Because in one of the next videos we are going to make the Super Knobs morph the volume of two Parts, one becomes louder while the pother becomes softer.
Why assign Reverb to knob 4 while it already is available as a parameter under knob 4? This is for ease of use. To tune Part 1 Reverb we would first have to press the Parameter Tune Button, then select Part 1 in the Performance screen and then rotate the knob … far too much work when in a live performance. By assigning it to Common Knob 4 the Reverb for Part 1 is readily available from the moment we activated the Performance.
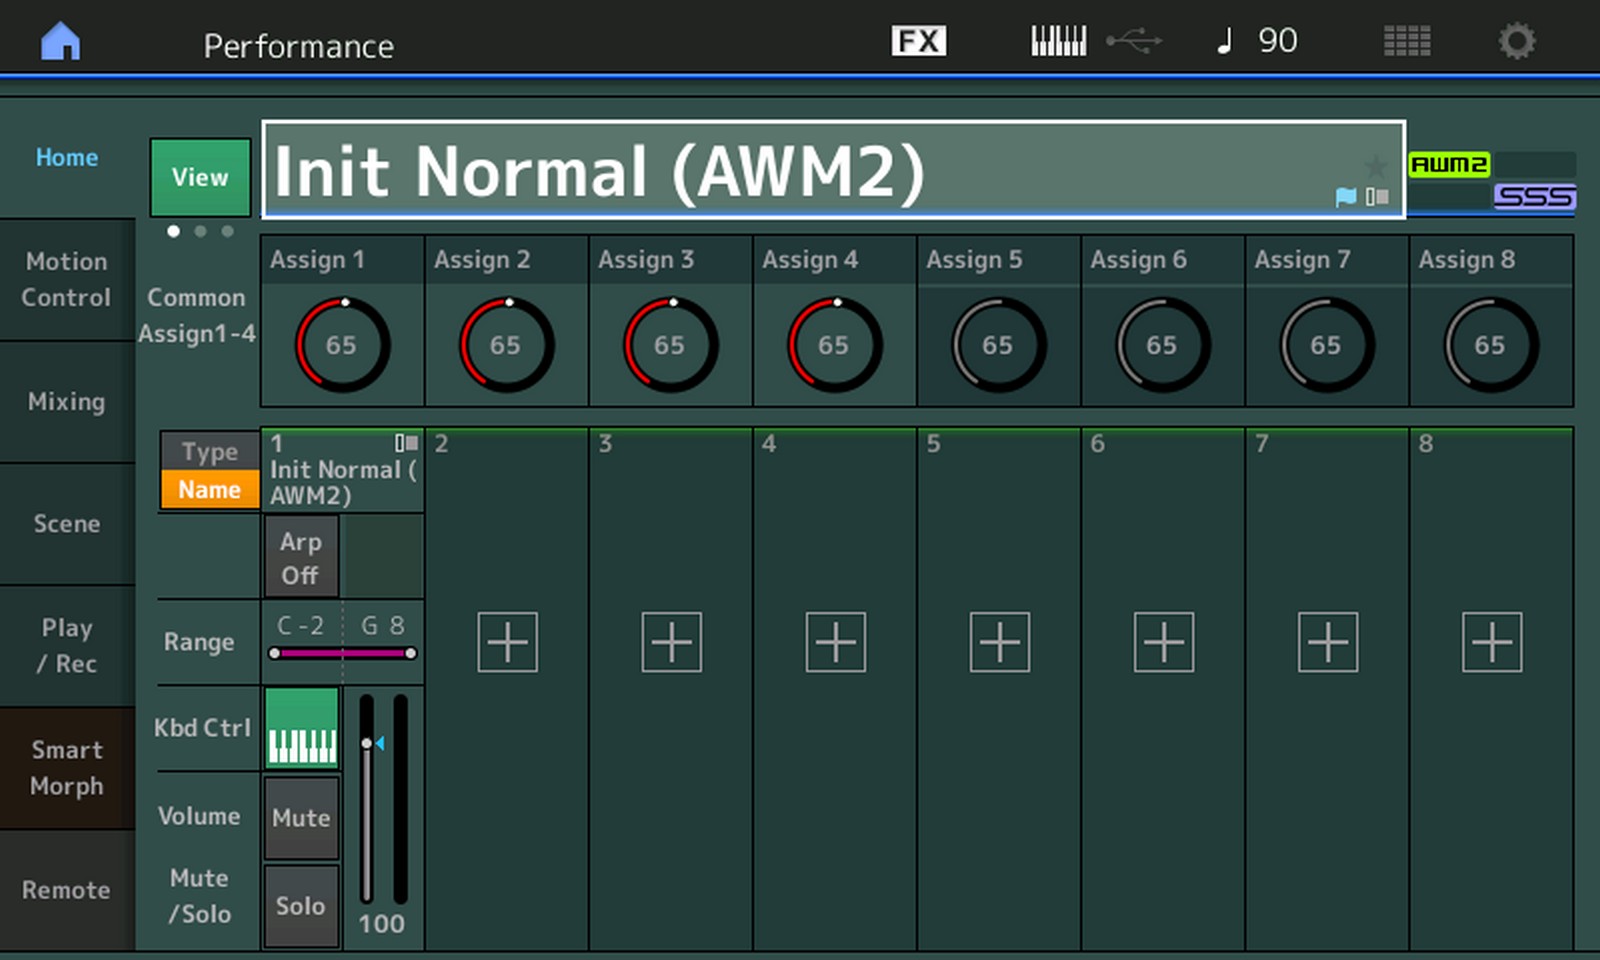
Let’s open the ‘Init Normal (AWM2)’ Performance. This can be found via a press on the CATEGORY button and tapping the ‘Init’ category.
This is a one Past basic piano sound without any knobs assignmed and with only a Reverb effect.
This is the goal we set ourselves to accomplish:
– Assign Common Knob 1 to Part 1 Volume.
– Assign Common Knob 4 to Part 1 Reverb Send.
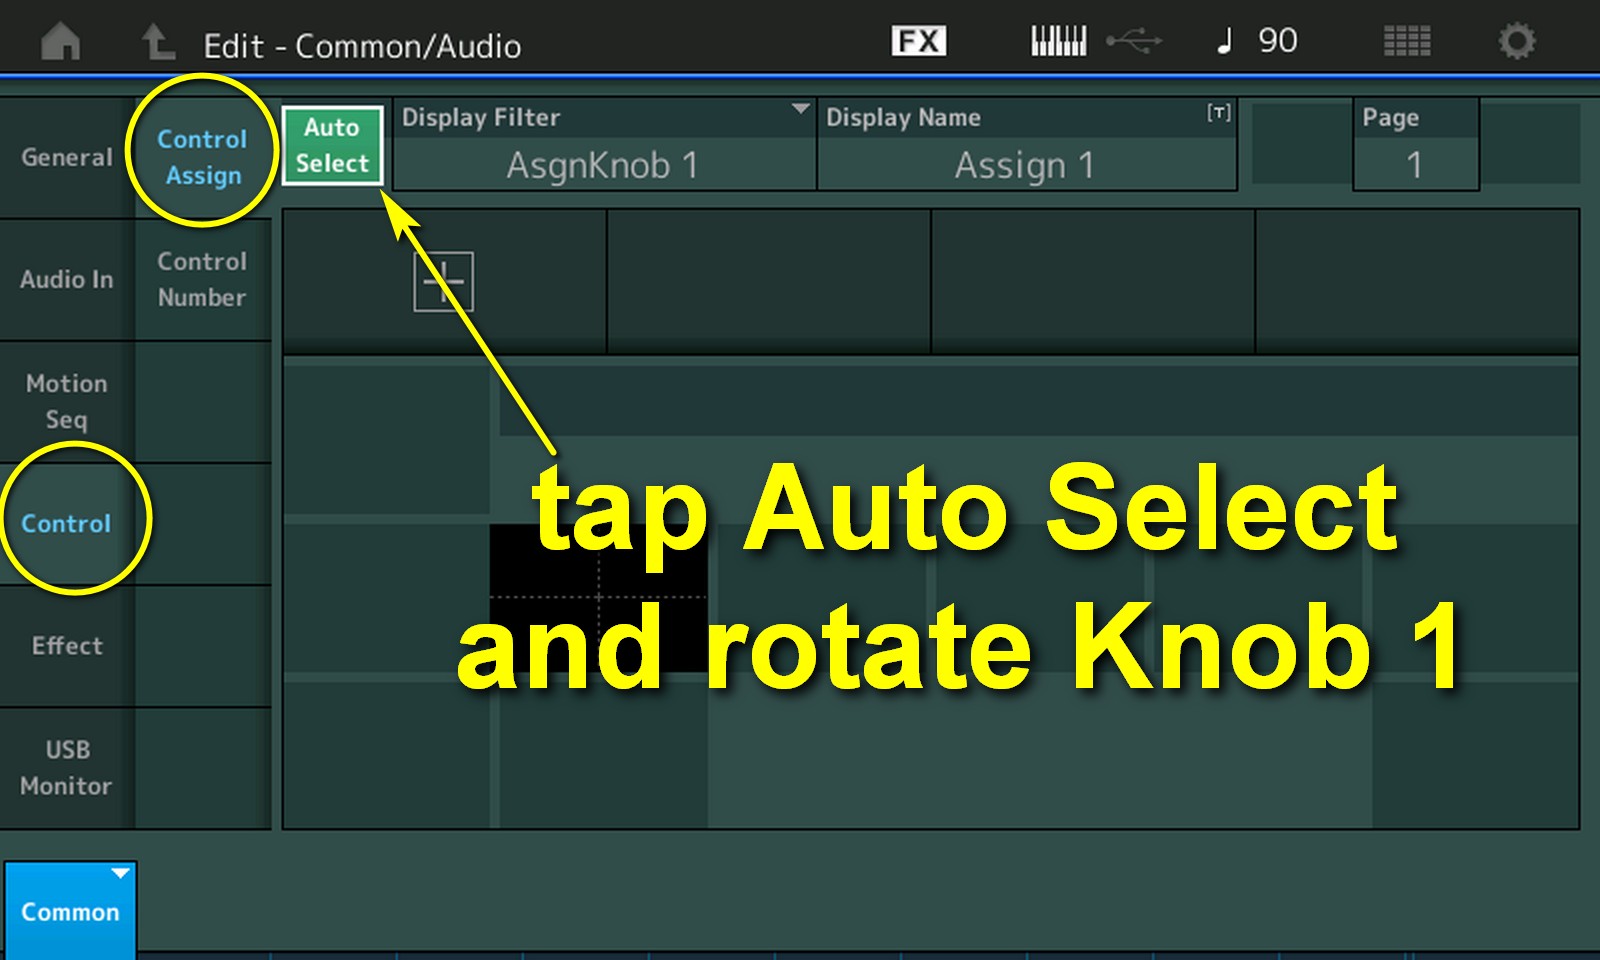
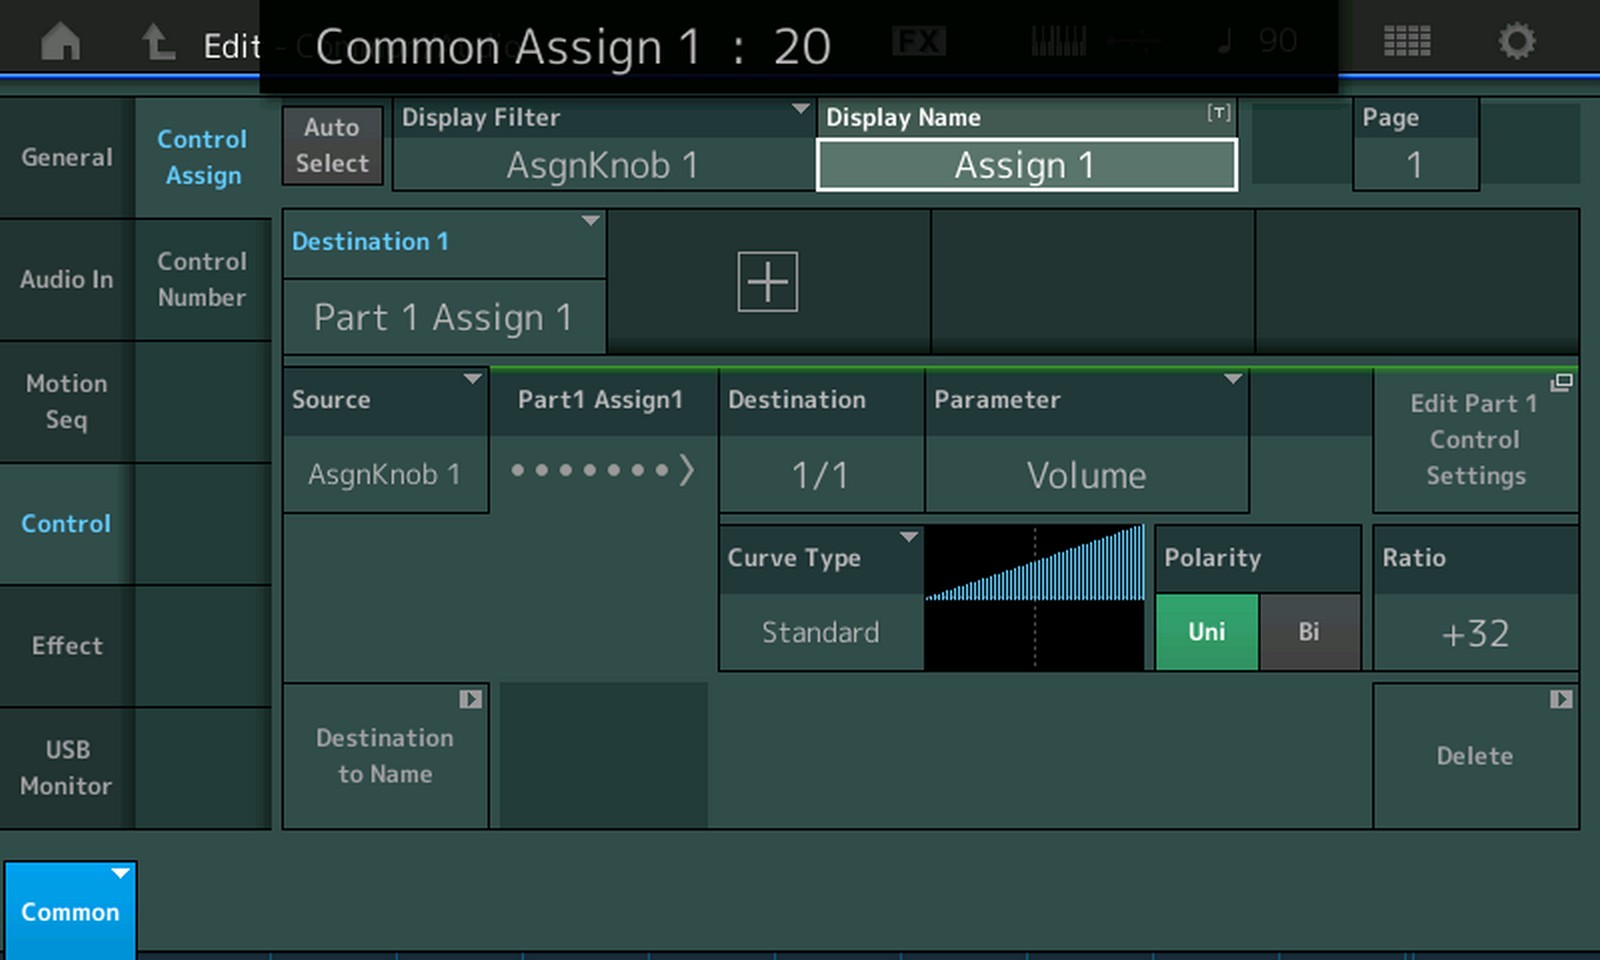
Press the EDIT button to enter Performance Edit Mode and tap Control > Control Assign.
Tap the Auto Select field and rotate Knob 1.
It’ll be automatically selected and it now is the knob that we can edit.
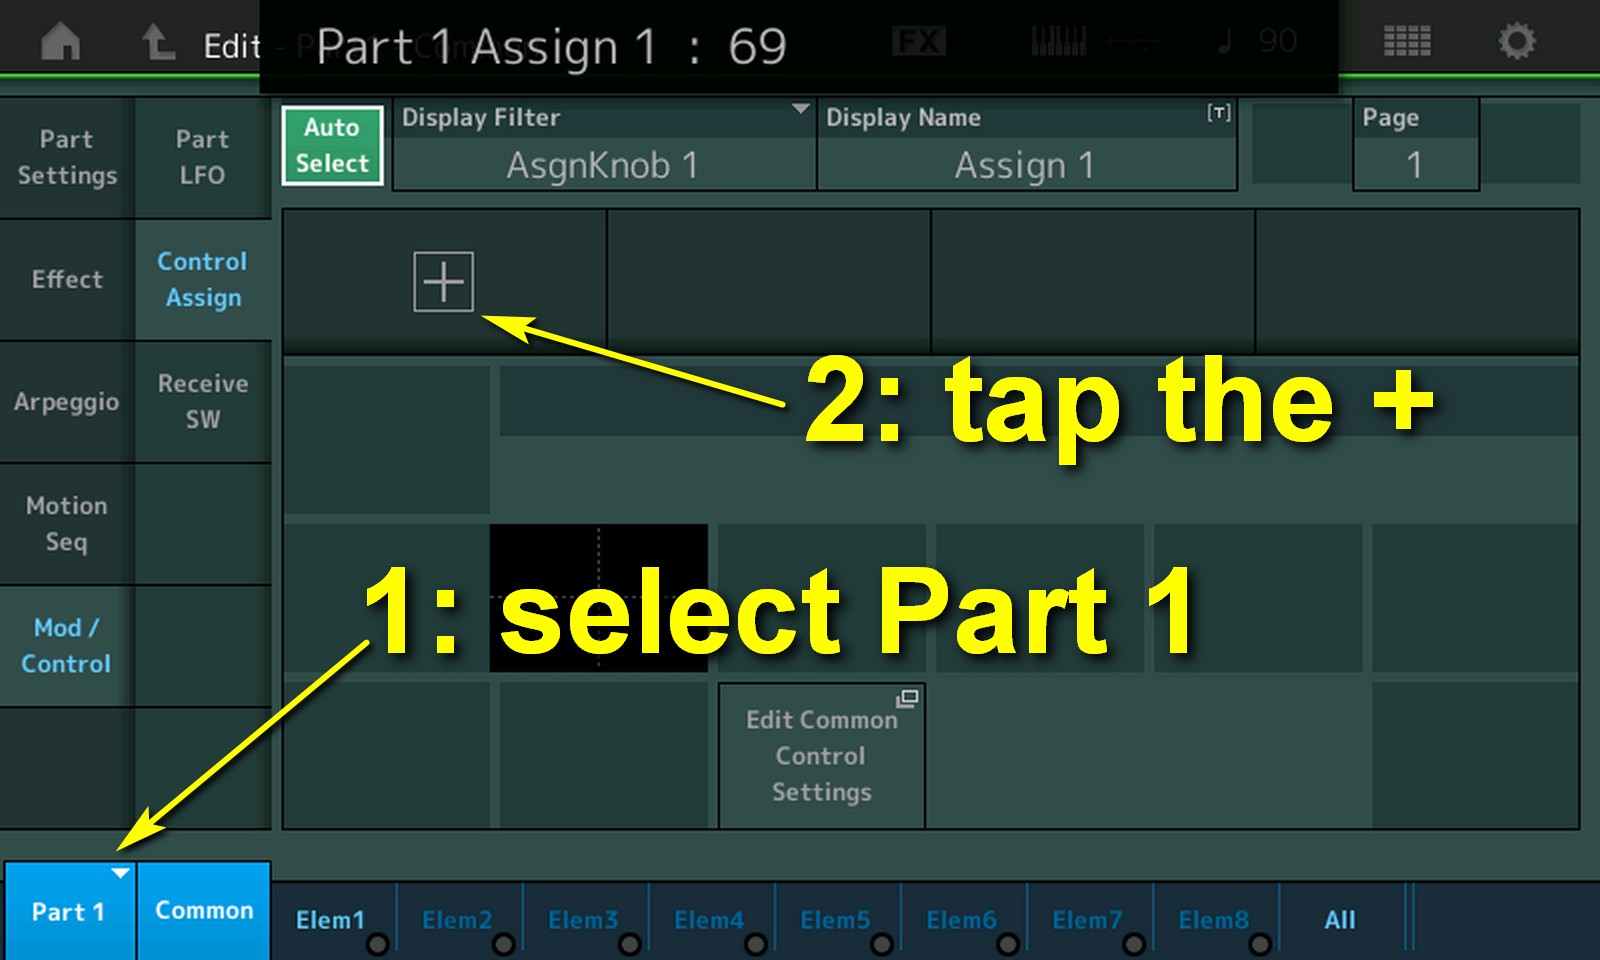
Bottom left it shows we’re in the Common section. Tap this field and select Part 1. It should look like the picture now.
Now tap the + to create a new assignment for Knob 1. We can now selects a parameter to be controlled by Part 1 AsgnKnob1, which is called the source.
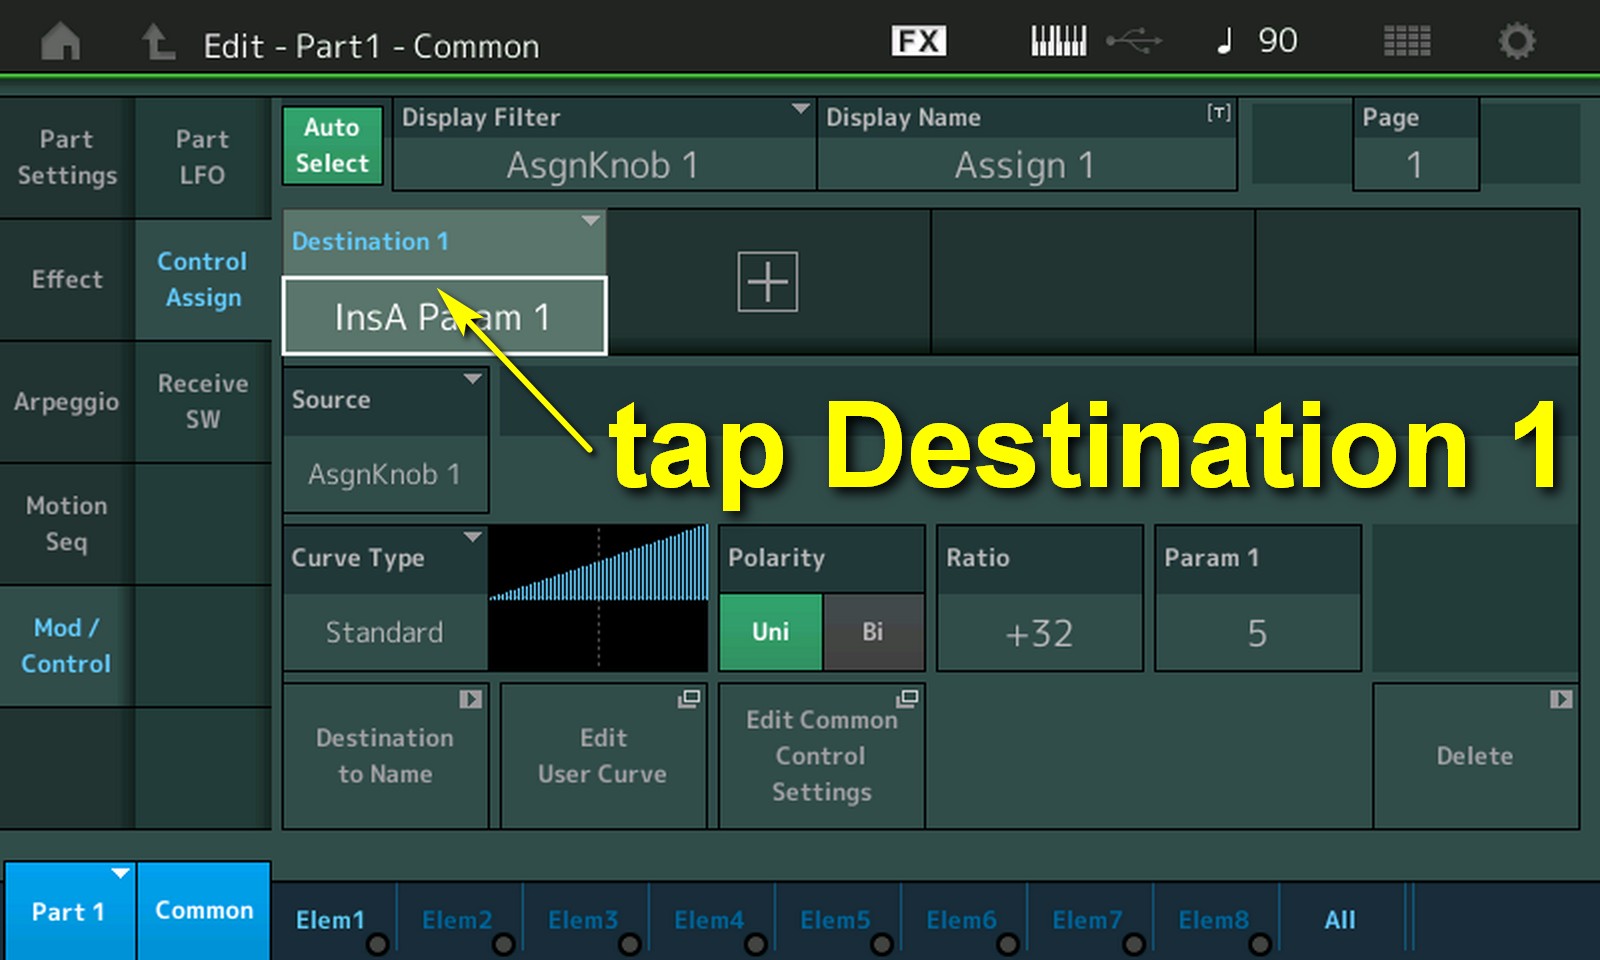
By default parameter InsA Param 1 is shown. This is called the Destination.
We want to change this to Part 1 Volume.
Tap Destination 1.
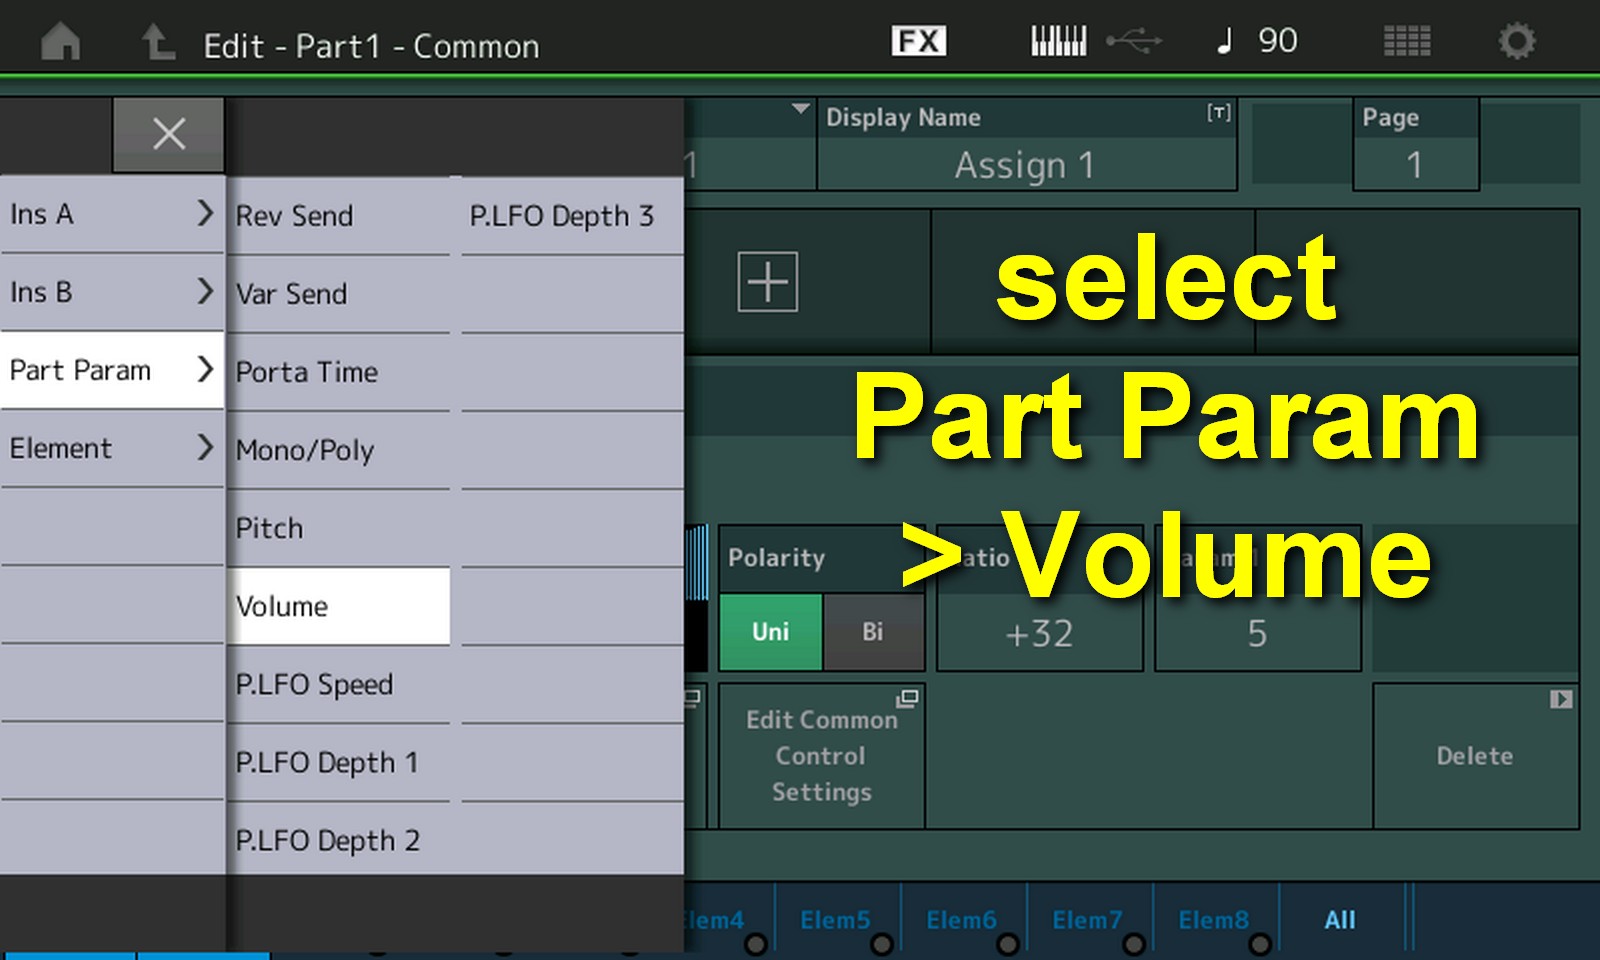
We can now select a parameter from the left side menu.
Volume can be found under Part Param.
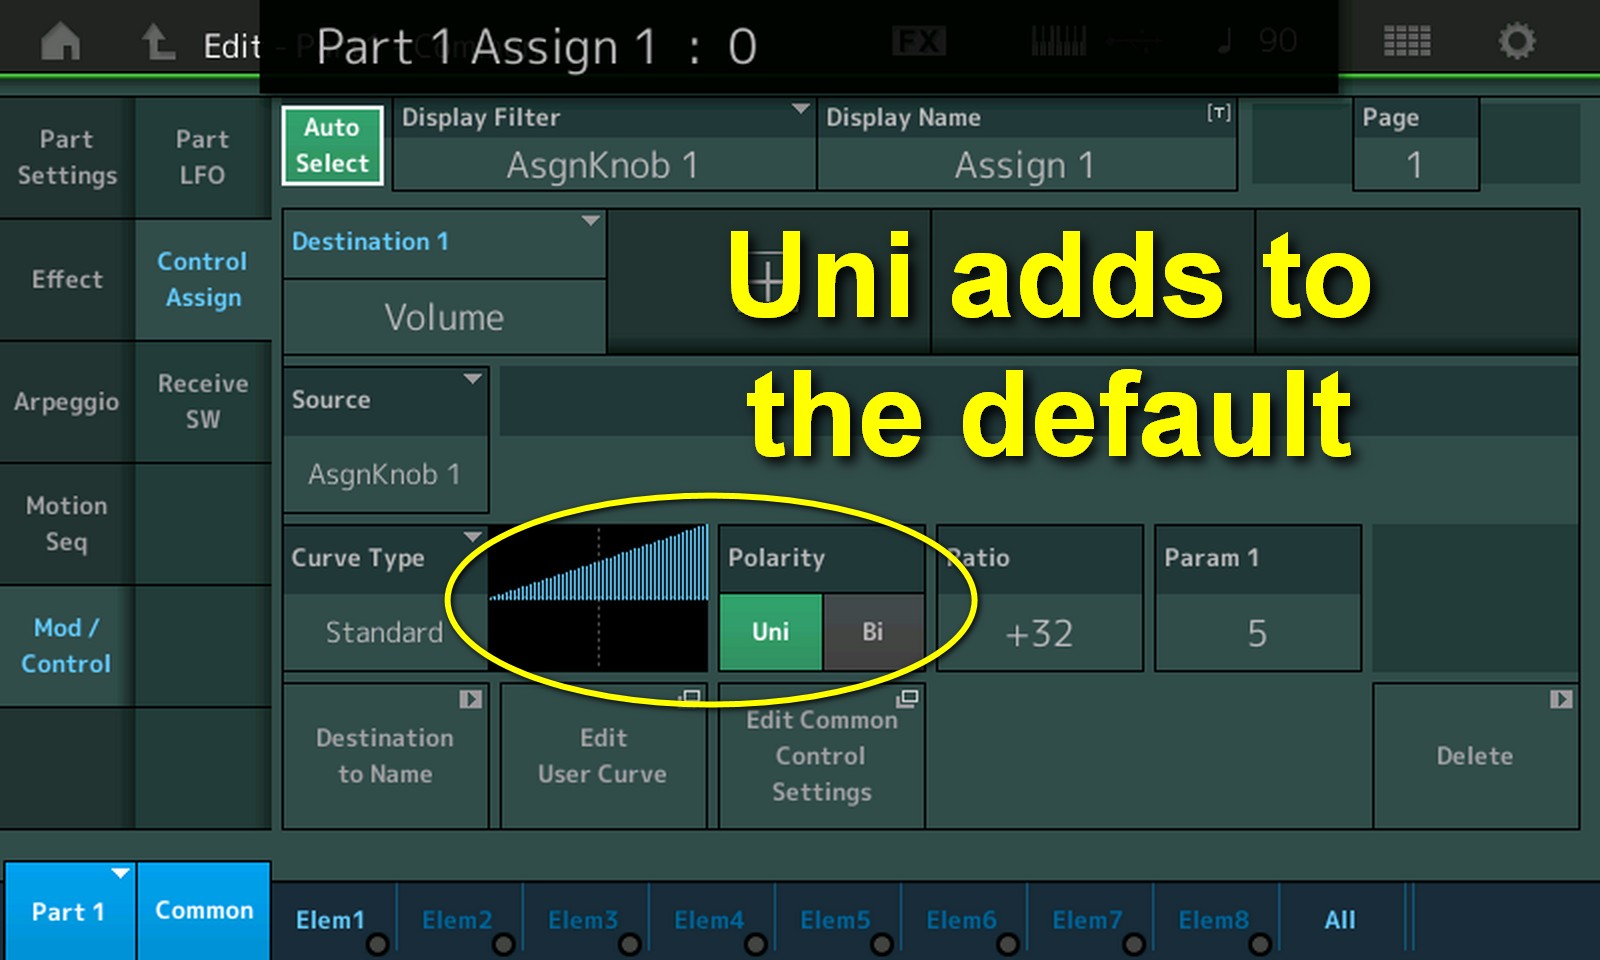
In the screen that opens we can set the details of this source / destination couple to our liking.
One of these settingsis Polarity. By default Uni is selected. The graph shows what it does … when we rotate Knob 1 the parameter will increase. Notice how the graph does not start at zero. The value at Knob = 0 will be the volume the Performance was stored with … with this Uni curve this is the minimum value. The Uni curve will increase this value from its minimum to max 127.

The minimum volume can be set in the Mixer screen.
If we set the default volume to zero this does not mean the Performance has to start with Part 1 volume zero … we can set Knob 1 at any position we like, say 73, and then store the Performance. Both the Mixer value of zero as well as the Knob value of 73 are stored, and now at startup the volume will be 73.
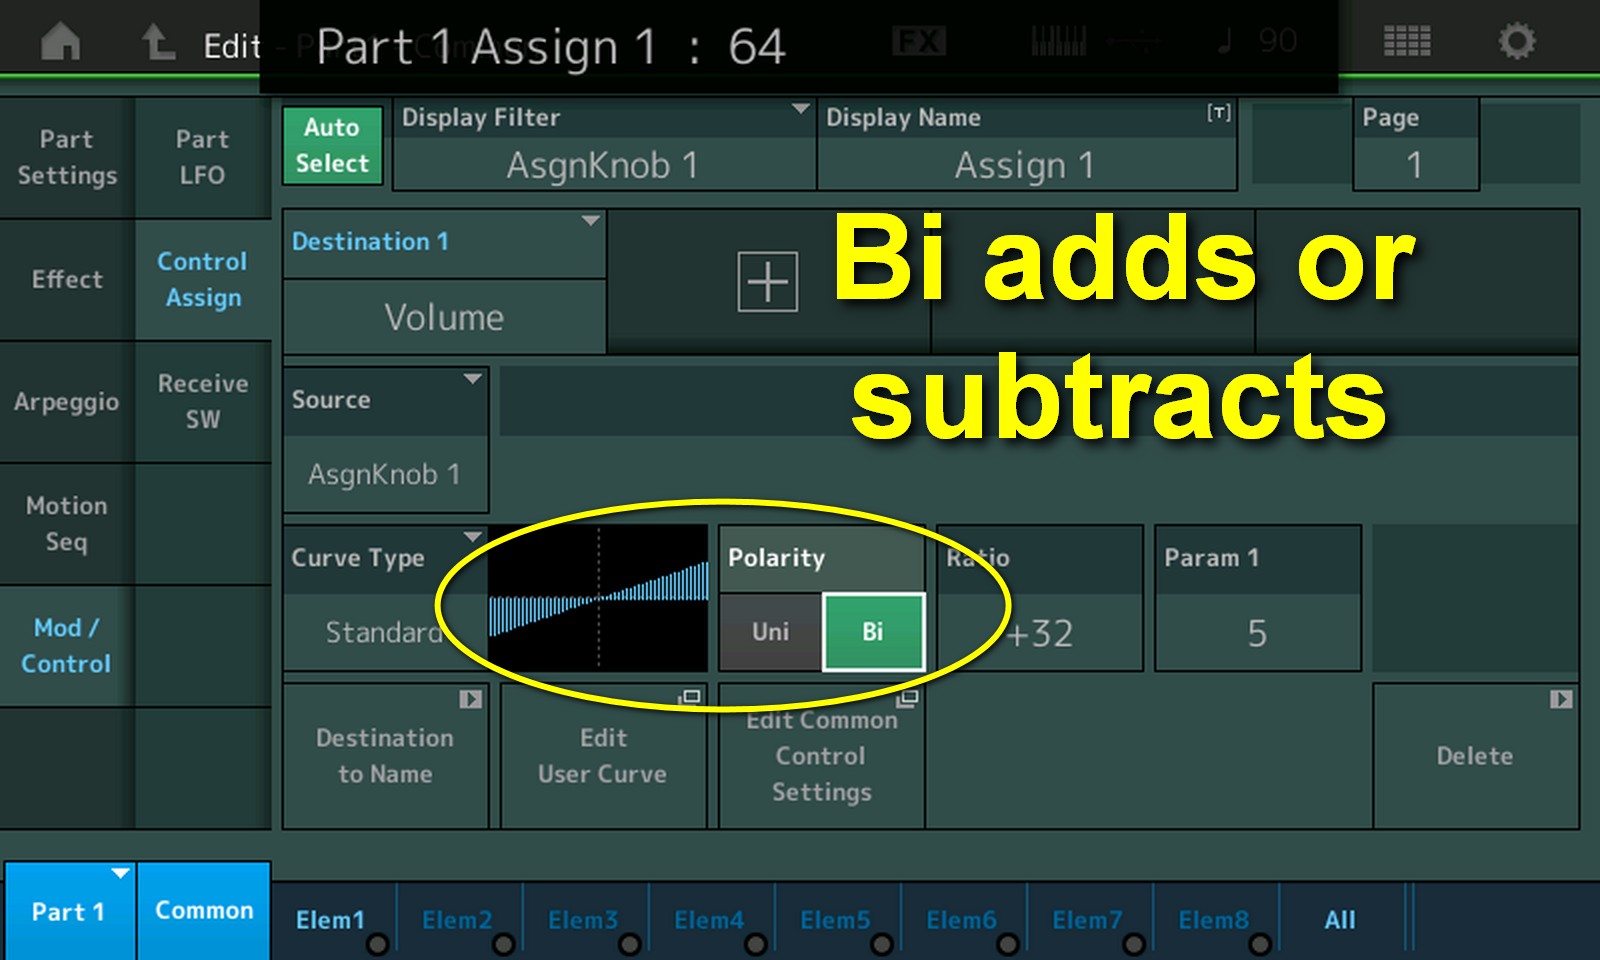
We could also set the Polarity to Bi … this makes the knob can both add to (turn right) or subtract from (turn left) from the default value.
If for example the default Mixer volume was set at 40, we can increase the volume by turning right, or decrease the volume by turning left. With the Uni curve we can only increase and 40 would be the minimum volume.
Volume on Knob 1 is done. Let’s now make Knob 4 control the Reverb.
Rotate Knob 4 … with Auto Select turned on it’ll automatically become selected.
Take care Part 1 is still selected in the blue field bottom left.
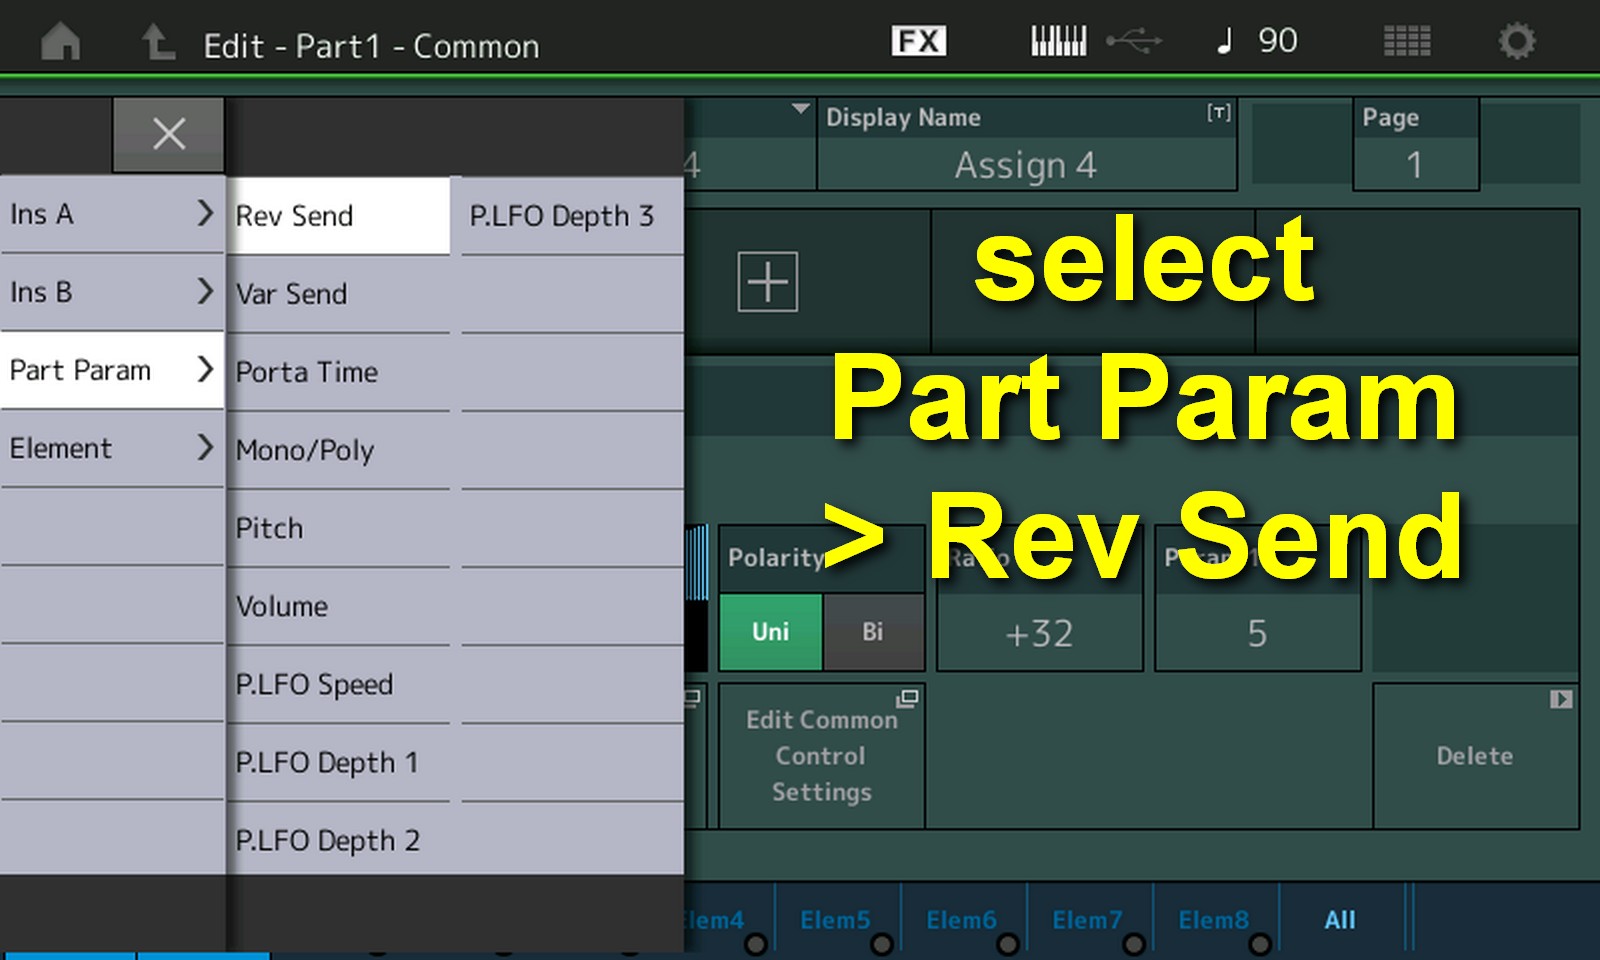
Press the ‘+‘ to add a destination and select Part Param > Rev Send.
Select Uni or Bi as to your liking. Personally I use Uni most of the time because to me it’s easy to understand:
- Give the parameter the desired minimum value.
- Set the Knob at the desired startup value.
- Store the Performance with these values.
- Done. From here the knob varies the parameter between the stored minimum and the maximum of 127.
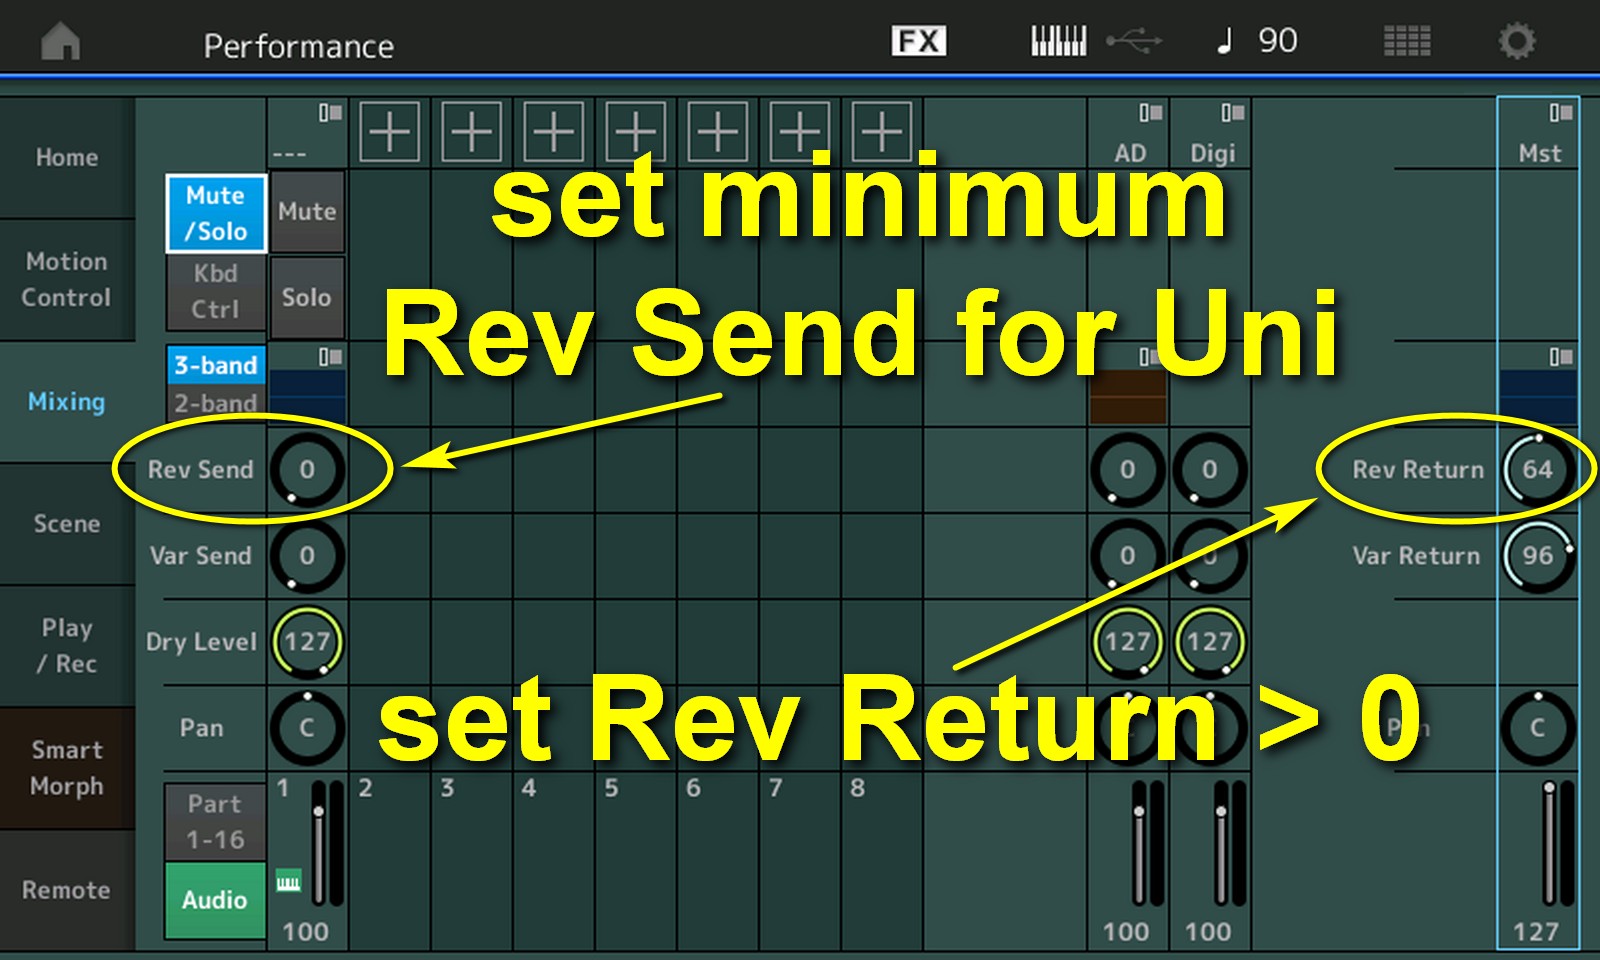
Knob 4 now controls Reverb Send of Part 1. We can only hear the effect when the value of Reverb Return on the Mixer Master channel is larger than zero.
Got to the Mixer screen. Set the minimum Reverb Send to your liking (zero means you can go to a completely dry sound). Set the Reverb Return, it controls the maximum amount of reverb we’ll hear in the sound mix.
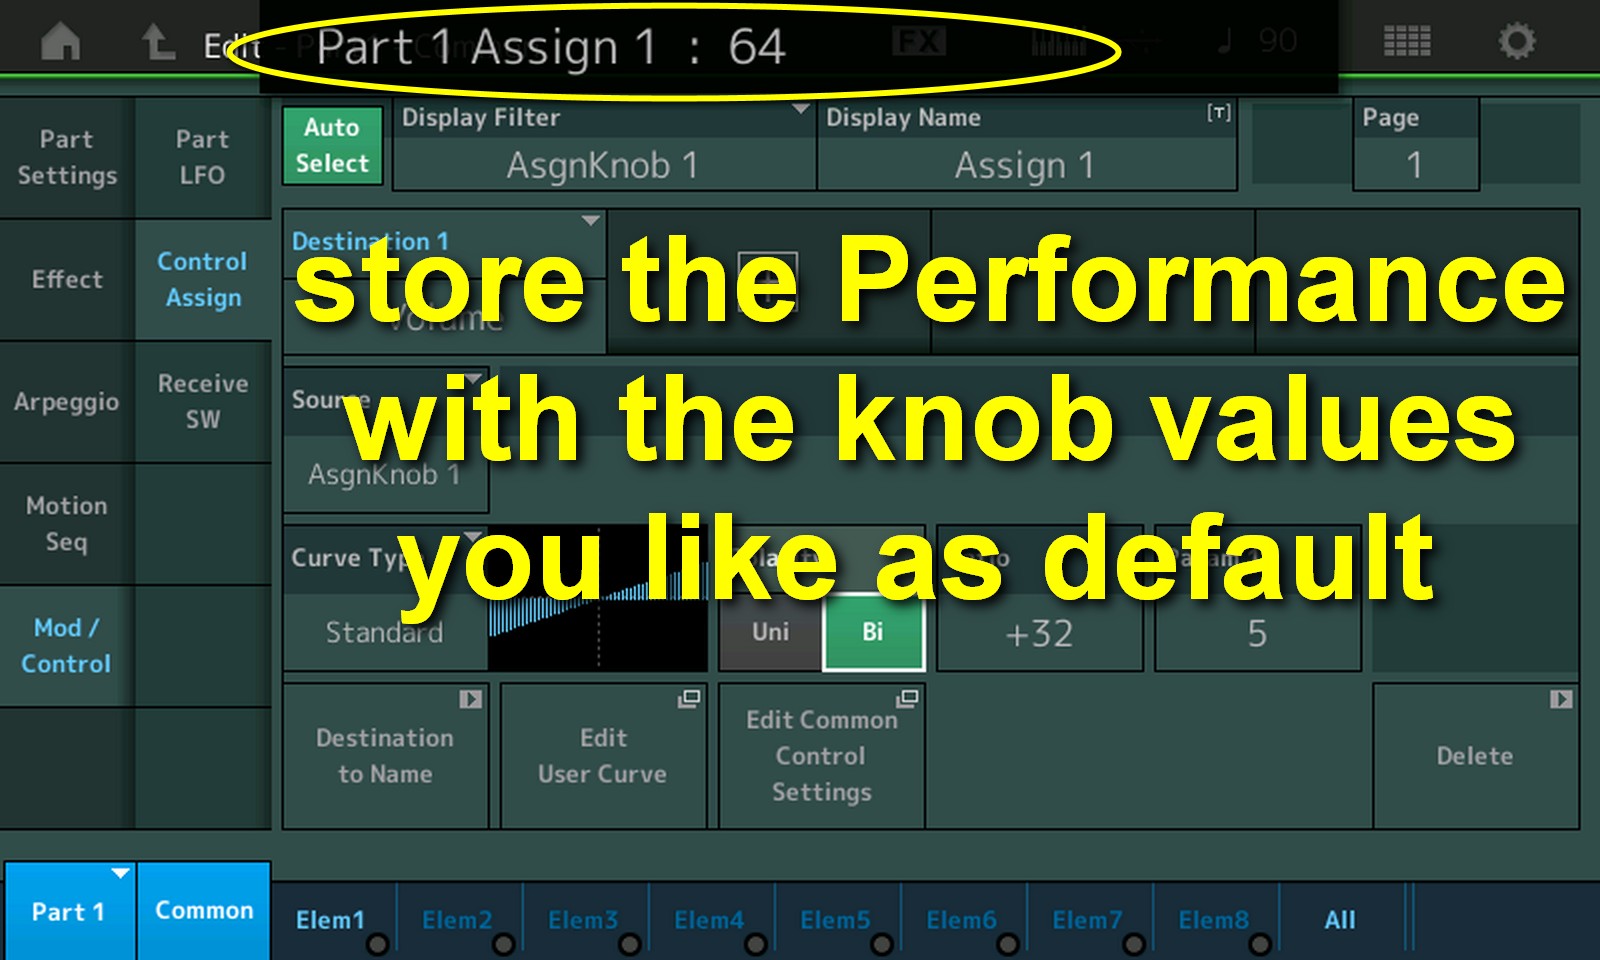
Set Knob 1 to the desired volume and Knob 4 to the desired Reverb level and press the STORE button to save the Performance. These Knob values will now be the default after startup.
OK, looks we’re ready, let’s try it out.
Hm, it looks like as long as Part 1 is selected in the Performance screen all is working well, but if Common is selected (tap the Performance name), which will be the case after opening the Performance via Live Set or via Category Search, the knobs control Common but nothing seems to be assigned to them!?
That’s because Knobs (can) do different things on Common level as on Part level, which they are on when a Part is selected / active on the Performance screen.
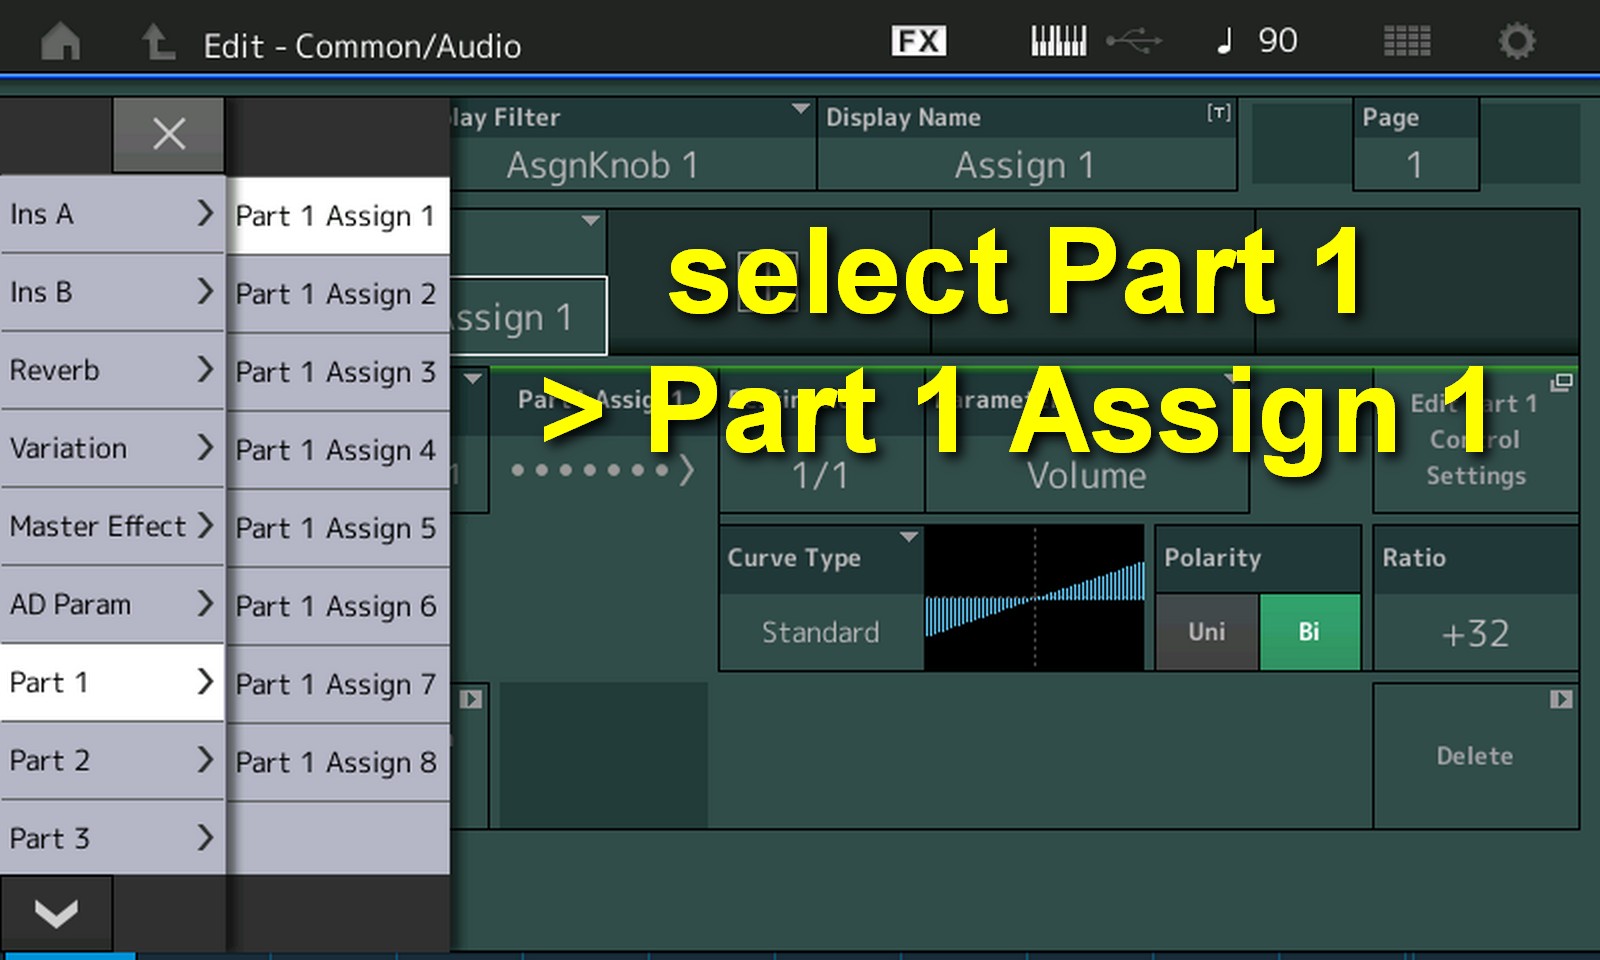
To make them work for a Part while we are in Common, we need to assign the Knob on the Common level to control the Part level.
- Select Common in the blue field, bottom left
- With Auto Select on, rotate knob 1.
- Tap the ‘+‘ to add a destination.
- Select Part 1 > Part 1 Assign 1 as destination.
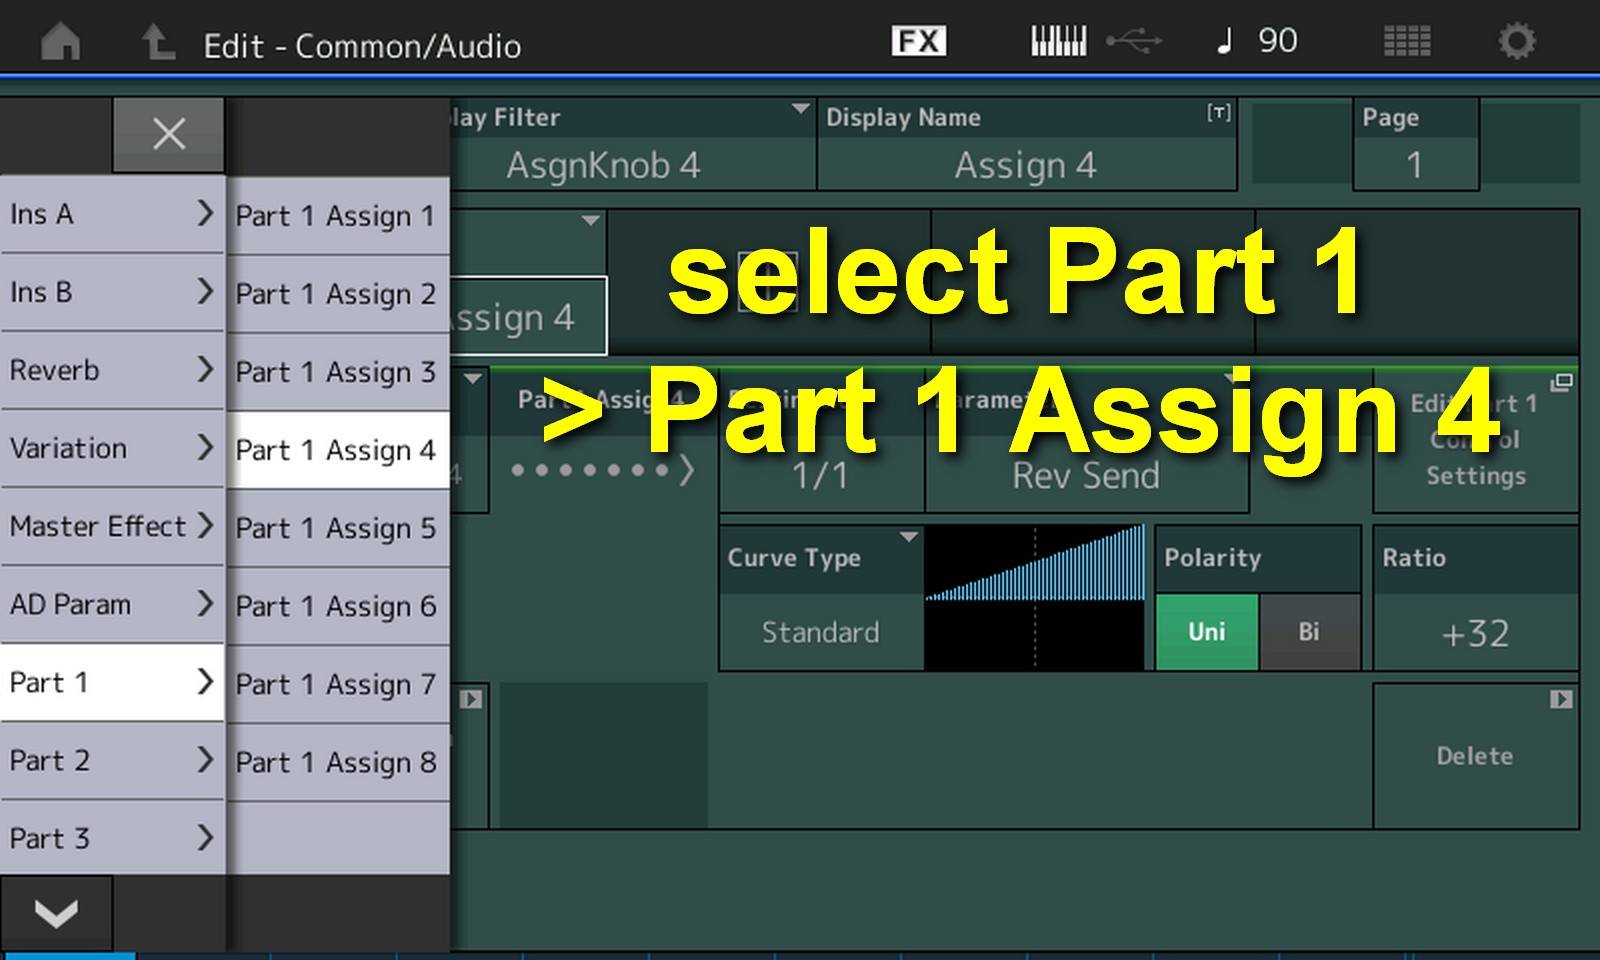
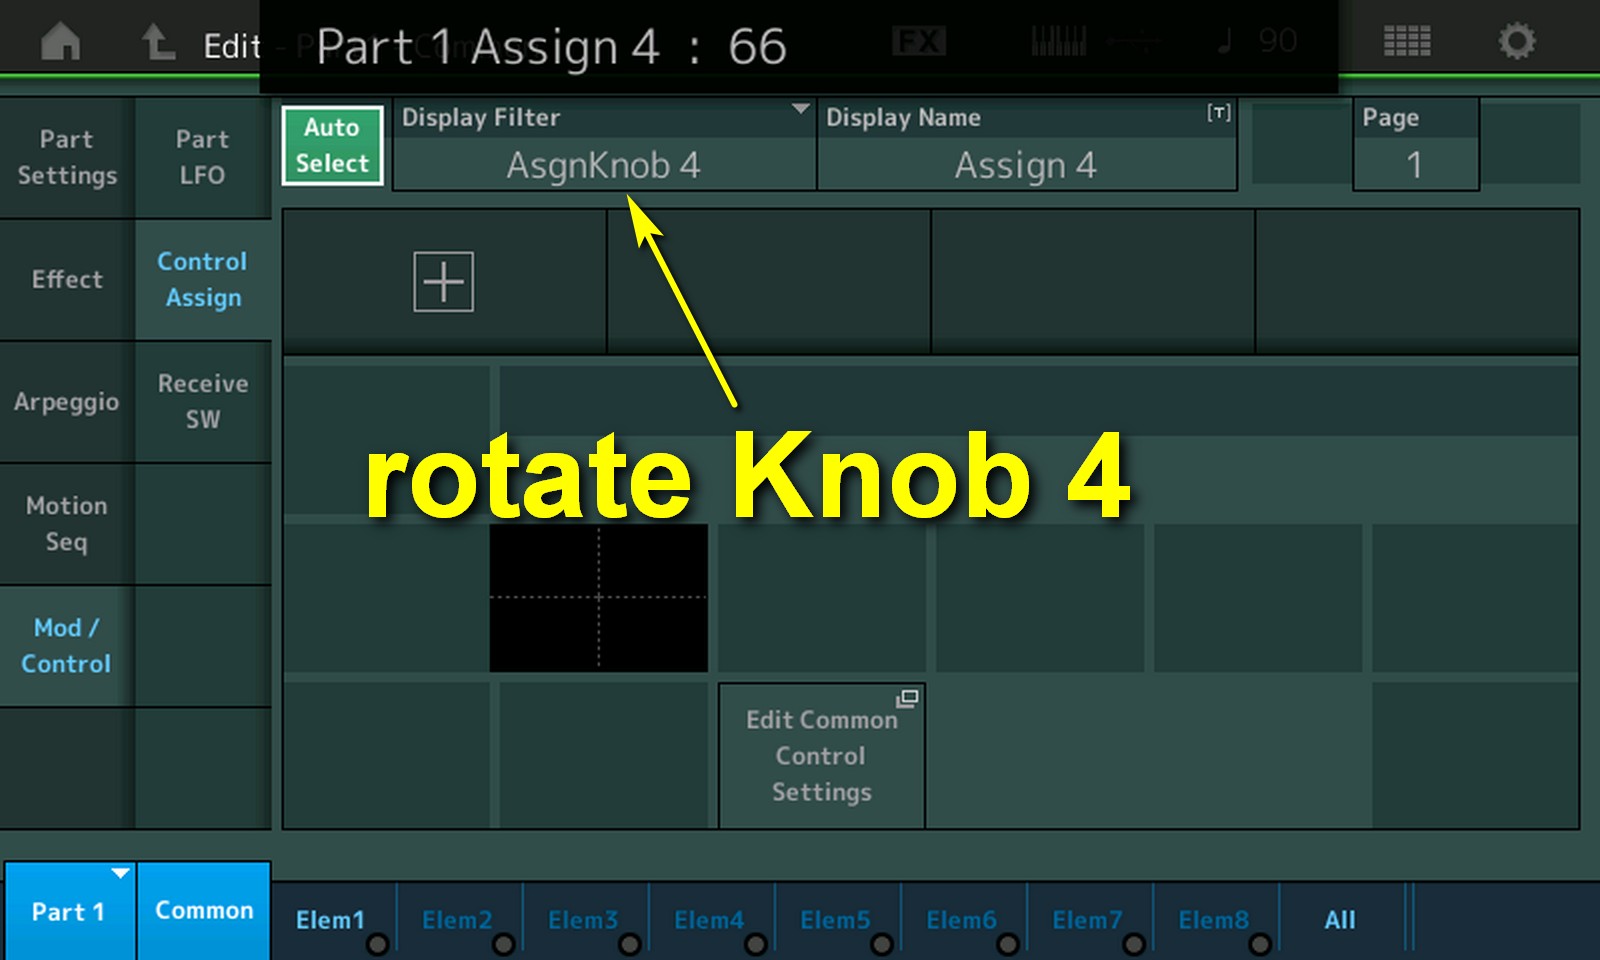
Rotate Knob 4 to auto select it. This time select Part 1 > Part 1 Assign 4.
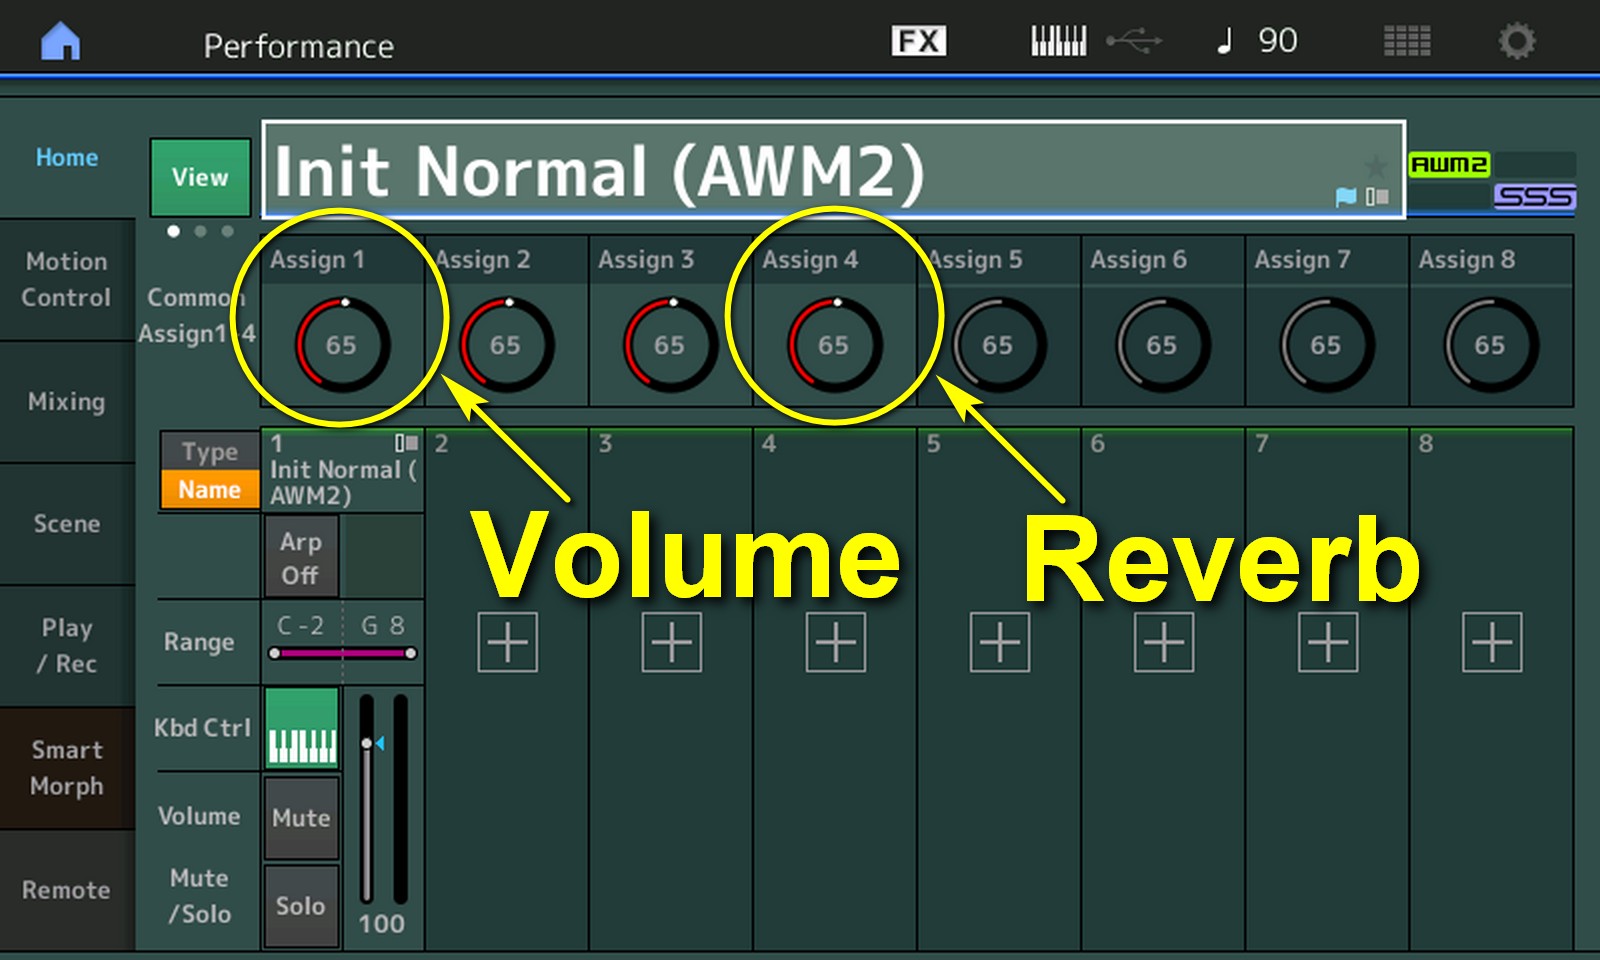
The result now is that on Common level Knobs 1 and 4 control Knobs 1 and 4 of Part 1.
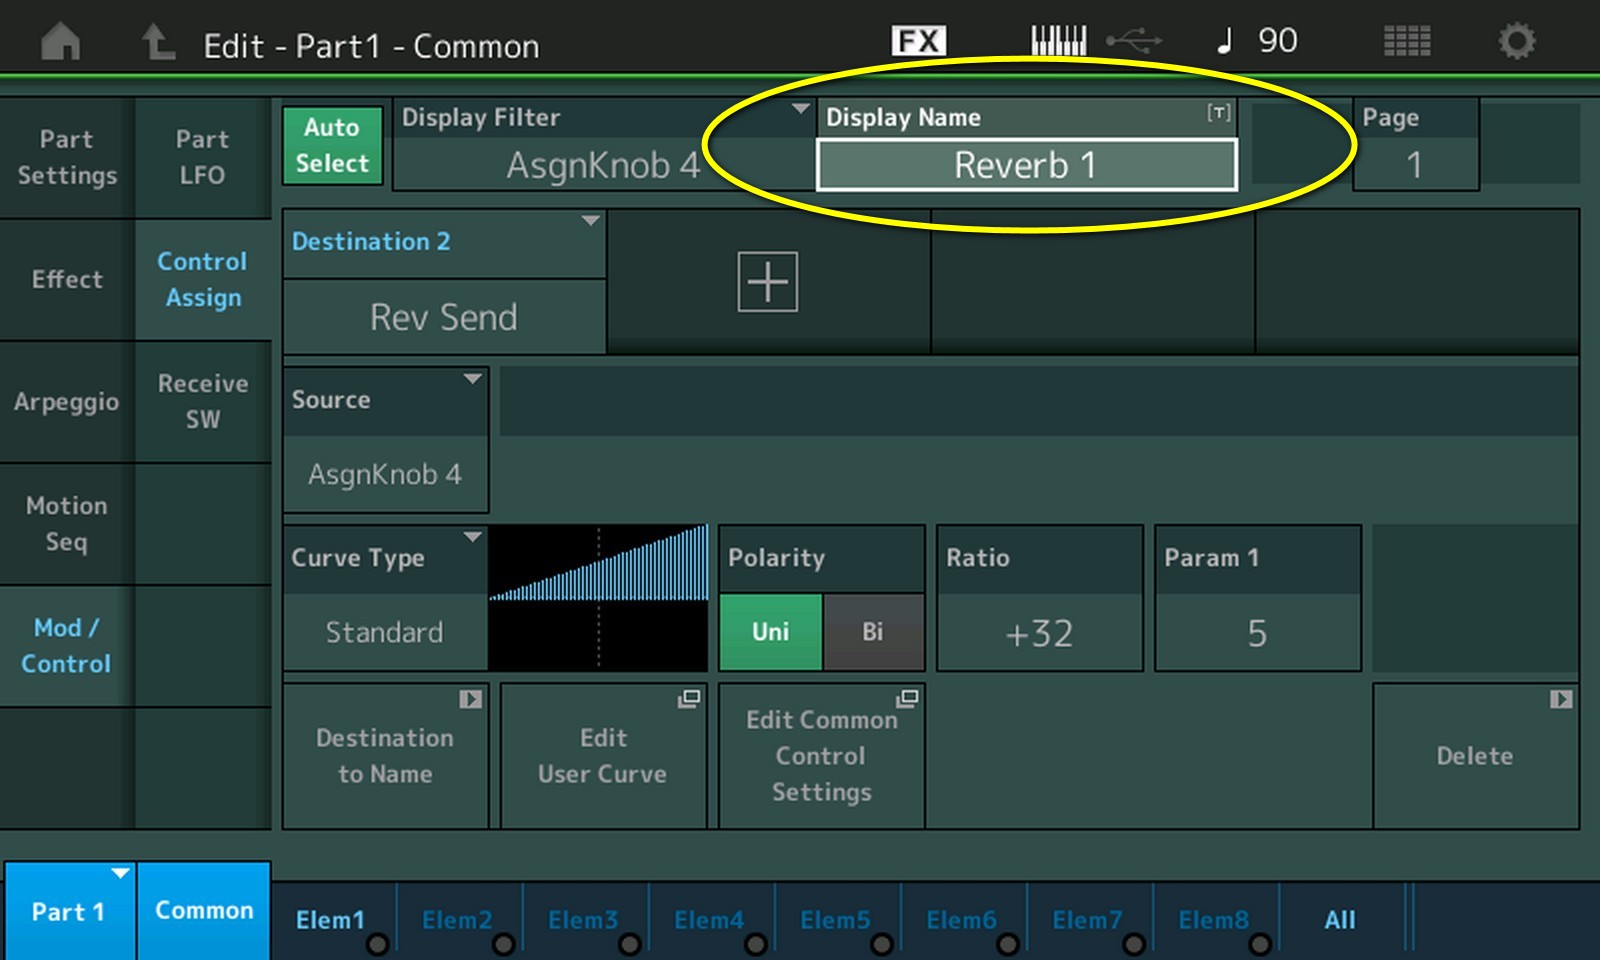
Let’s give the knobs a useful name. Tap the Display Name field and enter a name. Let’s rename Knob 1 to ‘Volume 1’ and knob 4 to ‘Reverb 1’.
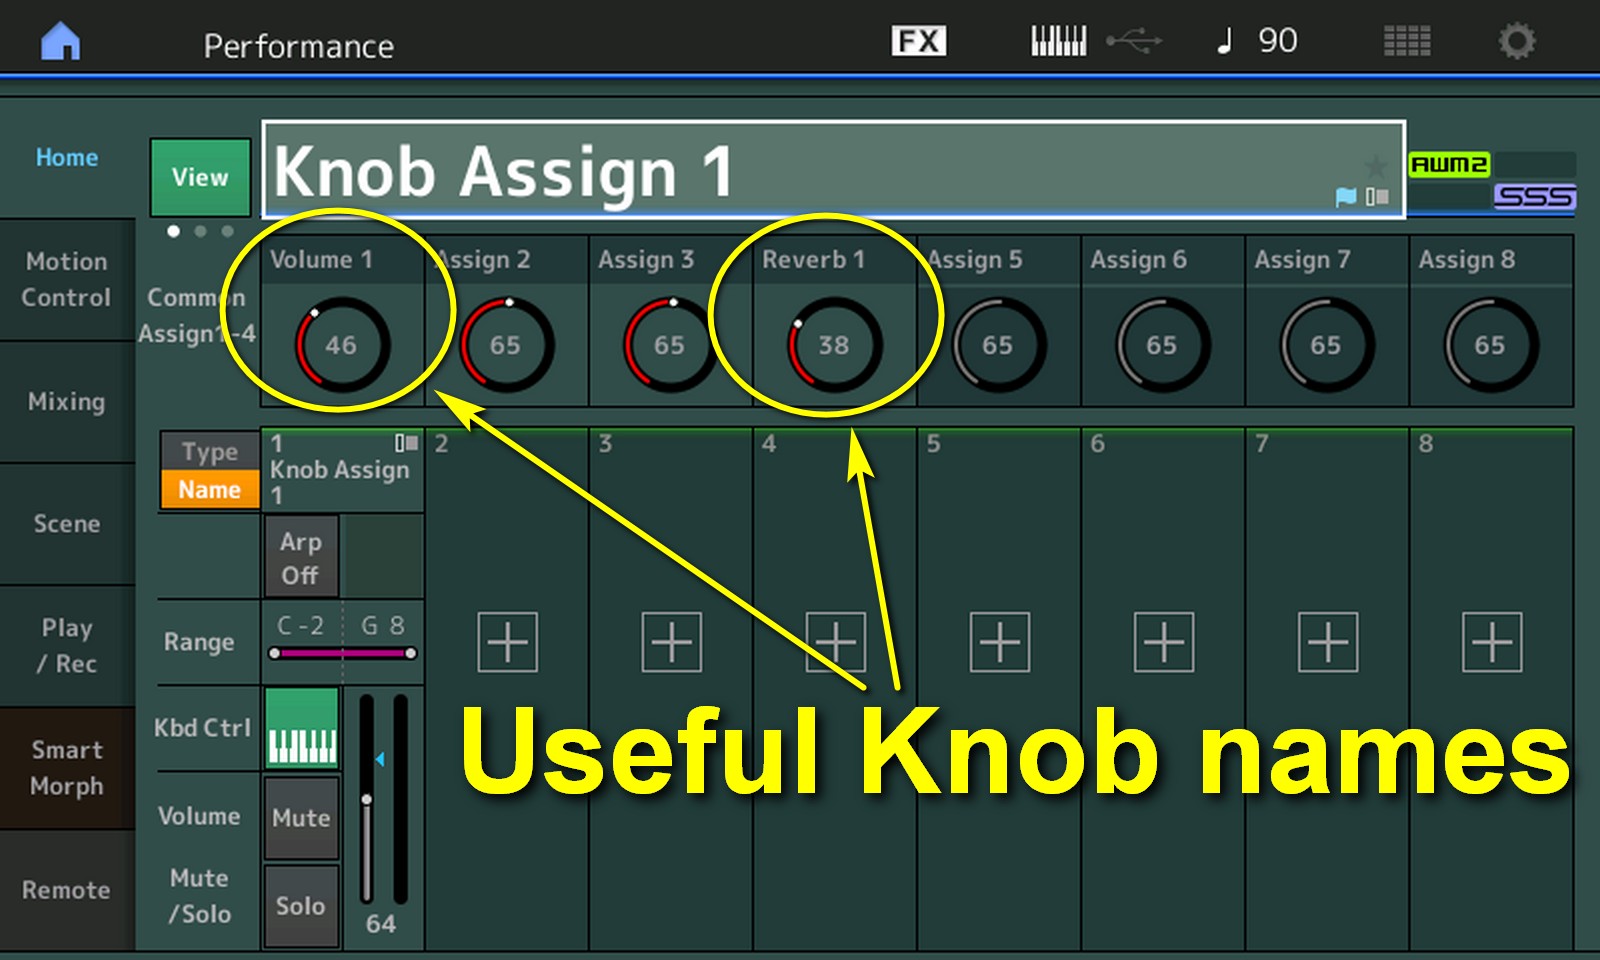
Now the Performance screen looks like this. We can see what each knob does. If you prefer an even cleaner screen you could also rename the other knobs so Assign# does not show there.
Don’t forget to now press the STORE button and save our hard work. As soon as we (accidentally) select another Performance not having saved this one first it has all been in vain.
It has happened to me that I touched the Dial Wheel while the Performance name was the active field, which made the next Performance become active … and all work was lost!
The next step is control the knobs via the Super Knob. The Super Knob can operate the 8 Assignable Knobs simultaneously. What we just did is transfer Common control to Part control, this makes it possible to control Part 1 volume via the Super Knob. Now imagine we add another Part, with reversed volume control, then we have created a Morph between two Parts. This is what we’ll do in the next video.
— 0 —
